Before
we begin with the step-by-step instructions.
Have
you decided on the location? An
ideal location in your landscape for
a pond/waterfall is near a patio, where
you can enjoy its soothing sounds. However,
almost any location is acceptable. Just
make sure that your pond can be viewed
and heard by you and your guests from
sitting areas and other viewpoints.
Location and size are the two most important
decisions you'll make about your water
feature. By some estimates, 90 percent
of the original water gardens sold are
replaced later with larger ones. An
enthusiastic pond hobbyist always finds
new plants or interesting fish to add
to his investment.
Trace
your prospective pond out on the ground
with a garden hose to help you visualize
what the finished size will be. Look
for an area that offers a slope as slopes
are perfect for use as a backdrop and
foundation in constructing your waterfall.
Precaution: If you
have even the slightest suspiscion that
you will be digging near buried cables
make sure to call your local utility
companies to have the location of these
cables marked before digging.
Have
you decided what type of liner? Chances
are, if you have come to this page you
are inerested in using your own creative
abilities to design and integrate a
freestyle garden pond into your landscape
and your choice of liner will be a flexible
one. If you've decided to use a rigid
preformed pond liner go here
to see the many varieties available.
Instructions for installing a prformed
pond will come with your purchase.
Building
Your Garden Pond
Tools
you will need:
- Round
and flat point shovels
|
- Carpenters
level and a 2x4 lumber
|
- Can
of orange spray paint
|
- Pruners
to cut away roots
|
|
|
IMPORTANT!
Before buying any materials, begin,
if you haven't already done so, by drawing
a simple sketch on paper of the general
shape you would like to build your pond.
As a general rule, a 180 square-foot
or 11' x 16' pond is a good "standard"
size water feature, however, you may
build a pond whatever size you desire.
Step
1 - Outlining Your Pond
Use
your sketch as a guideline to outline
the shape (outside perimeter) of your
pond on the ground using orange marker
spray paint or a garden hose. We always
use paint. Most pond excavations have
flat ledges, called plant shelves, at
different depths all around the perimeter.
These plant shelves allow for the placement
of different types of plantings of varying
heights. Paint out these lines for shelves
as well.
If
you plan to have a waterfall mark with
paint where you intend to locate it.
Visit
Building
A Waterfall for
detailed instructions on building a
waterfall.
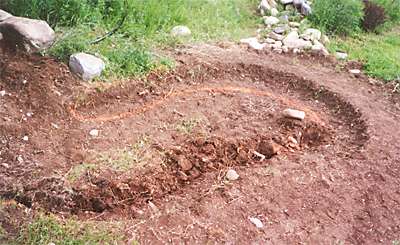
Step
2 - Excavation
Now
that you have outlined your pond excavation
may begin. Start by first digging out
the deepest section of your pond. If
you plan to have fish, make sure to
dig one section of the pond at least
30" deep to provide a safety zone
if predators come around.
If
your area around the pond is flat use
the excavated dirt to build a mound
for where your waterfall will be located.
(On flat ground we usually don't go
more than about 18-24" high for
the waterfall). Visit Building
A Waterfall for detailed instructions
on building a waterfall.
If
you are building your pond on a sloped
grade place excess dirt around the bottom
half or so of the perimeter create a
level rim around the top of the excavation.
This will ensure that when you fill
your pond, the liner on one side or
the other in the interior of your pond,
will not show.
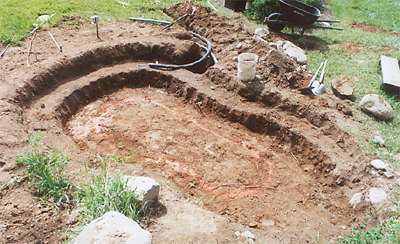
After
digging out the deepest area of the
pond to 30" deep or so, start on
the next deepest level (18" deep),
and then the next (12" deep).
If
you plan to use a submersible pump and
would like to make sure that it is hidden
from view excavate an area outside of
the perimeter where the pump will go.
This area should only be wide and deep
enough to house your pump and the container
or pot that you will enclose it in.
Visit Building
A Waterfall for detailed instructions
on building a waterfall.
NOTE:
As you excavate dirt and build
berms keep a carpenter level handy.
As you go, place a 2x4 stick of lumber
across the top edge of the excavation
to ensure that when excavation is completed
the water level will be at a even height,
just below the flat rocks that will
hang over the edge of the water. Measure
level from different angles as you go.
Minor adjustments can always be made
later.
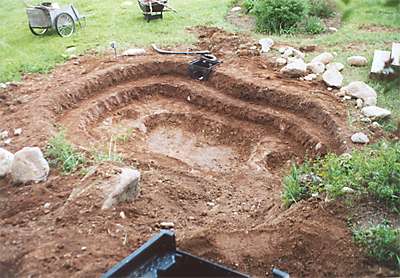
After
excavation is completed, remove any
rocks, sticks, and other debris. Then
line the bottom of the hole with an
inch or two of sand and a 1/4 -inch
layer of newspaper or carpet.
At
this point you may want to consider
tiering (stair-stepping) any berm that
you have created around the perimeter
of your pond so that when placing flat
stones there later they will have a
flat shelf to lie on.
Step
3 - Obtaining Supplies
After
excavation is completed you are now
ready to measure for a liner. Determining
the size pump and tubing you will need
will also be necessary. The reason to
wait until this point to purchase supplies
is that you never know how wide or deep
you will actually go when it comes to
the excavation process. What if you
prepurchased a custom-cut liner that
ended up to be too small? You
want to wait until the excavation is
completed to measure and then purchase
the pond liner.
Measuring
for the Liner - Liner size
is calculated based on the width, length
and depth of the excavation, the size
and number of plant shelves, and the
amount of edge overhang, so the sizing
will be more accurate if done after
the excavation is complete.
To
measure, we use a sewing measuring tape.
First, determine the width the liner
will need to be by laying the measuring
tape along the widest point in your
pond. Press the tape flat across any
shelves and drape over any berms around
the perimeter. Add a foot or so to your
final measurement to allow for any errors.
Next, determine the length the liner
will need to be by laying the tape along
the longest point in your pond.
NOTE: If you will be constructing
a waterfall, measurements for a liner
to run beneath the water will also need
to be taken and written down. Visit
Building
A Waterfall for details on liner
requirements for a waterfall.
Choosing
a Liner - A flexible pond liner
is a heavy, black rubberized or synthetic
material that is specially designed
and manufactured for this purpose. Do
not use plastic sheathing, swimming
pool liners, or other materials for
your pond liner, as they are easily
damaged and can be susceptible to degradation
by sunlight and freezing temperatures.
We prefer using Permalon,
an industrial 12 ply cross grain polyethylene
laminate for maximum permanence with
rugged strength and light weight for
easy handling.
Choosing
a Pump for a Waterfall - Pumps
are available in both submersible and
external (out-of-pond models). Reputable
water garden suppliers
have charts
and other information available that
can help you select the best model and
connecting equipment for your purposes.
For the smaller pond, a submersible
pump is the most economical. Depending
on the size of the pond, a filter
and even a skimmer
may also be incorporated.
Pumps
come in a confusing array of models
and sizes.You will need a pump if you
are planning on moving water in your
pond, whether by a waterfall, stream,
fountain, or spouting ornament. Below
is some information that will help you
determine what size of pump you will
need for your pond or water feature.
It will not matter whether the pond
has a liner, or if it is a preformed
pond.
Pumps
are sized by gallons per hour (GPH)
output at one foot of lift or height.
Larger capacity pumps are rated by horsepower
(hp). Manufacturers offer charts that
break down the power of each size pump
according to incremental heights of
one foot. Some companies label pumps
by GPH while others assign letter or
number designations that require cross-referencing
to charts.
It
is recommended that the water in a basic
pond be turned between ½ to 1
times per hour. A 500-gallon pond should
have at least a 500 Gallon Per Hour
pump. When sizing a pump for a pond
there are a few other considerations.
How high will the pump have to lift
water? Will there be a waterfall or
fountain? Will there be filters? All
of these variables reduce the amount
of flow, which could affect water quality
and clarity.
(Don't
let any of this technical information
about pumps scare you away! A few simple
mesurements taken will provide your
pond supply source or local
pond consultant with the information
needed to assist you in choosing the
right pump. Just remember this: DO NOT
skimp on the pump!)
Important
Measurements to Write Down
- To determine the pump required for
your pond:
Submersible
Pumps are placed directly in
the pond. They are free of distracting
noise and can be used to drain your
pond when necessary. These pumps do
have a disadvantage. The pump seal can
rupture, sending oil coolant into the
water. This can prevent surface gas
exchanges, thereby endangering your
fish. We would recommend the new magnetic-drive
pump, which avoids the use of
coolants. They are more expensive to
buy but are far less expensive to operate.
Calculating Water Volume
Rectangle Ponds. Length
in feet x width in feet x depth in feet
=cubic feet. Example: 10' L x 6' W x
2' D = 120 cubic feet x 7.5 gallons
= 900 gallons
Circular
pond. 3.14 (1/2 diameter in
feet x 1/2 diameter in feet) x depth
in feet = cubic feet.
Free
form shapes. Break the pond
down into a series of rectangles and
circles and figure the volume of each
area separately, then add the volumes
together.
NOTE:
Each cubic foot contains 7.5 gallons
of water, so always multiply the total
number of cubic feet times 7.5 to determine
the total number of gallons. Write down
the total volume of water your pond
contains.
Recommended Tubing Diameter
For Pumps To Waterfalls:
1/2-inch
diameter for flows up to 120gph
3/4-inch diameter for flows up to 350gph
1-inch diameter for flows up to 1000gph
1 1/4 inch for flows up to 1500 gph
1 1/2 inch for flows up to 3000 gph
Filtration
- A well designed larger pond should
include filitration. Ask your pond supplier
about a filtration system that will
work well with the pump you select.
Selecting
Rock - Visit your local stone
center to select the rock that will
be used around the perimeter of your
pond. Choose several different shaoes
and sizes that all blend together well.
Flat flagstone is a good choice to go
around the perimeter. Pick out some
nice boulders for an extra-added natural
effect. Visit Building
A Waterfall to find rock requirements
and suggestions when constructing a
waterfall.
Step
4 (Optional) - Building A Waterfall
You
will need to build the foundation of
your waterfall before installing the
liner in your pond. For detailed instructions
for building a waterfall visit Building
a Waterfall.
Step
5 - Installing the Liner
With
a couple of people helping, the liner
is unfolded into the excavation. The
liner is then smoothed into place from
the center-bottom up, and is lapped
over the top edge of the pond 6 to 12
inches. A small amount of water is typically
added to the bottom of the pond to weigh
the liner down and help with the smoothing
process. Folds in the liner, which will
be necessary to help it conform to the
curves of the pond sides, are incorporated
as the liner is smoothed out.
Once
the liner is in place you may begin
to add rocks or small boulders to the
interior of the pond if desired.
Make
sure to determine where a pump will
be placed if you are building a waterfall.
Also make sure to have your tubing in
place before constructing the waterfall.
Visit Building
A Waterfall for detailed instructions
on building a waterfall.
Step
6 - Add Water
Now
you can begin to add water! It could
take some time to fill your pond with
water using a garden so in the mean
time start placing rock around the perimeter.
If you are building a waterfall start
placing rocks here too. Make sure the
pump and tubing are in place. When the
pond is full of water all thats left
to do is hook up the pump!
Visit
Building
A Waterfall for detailed instructions
on pump installation and set up.
NOTE:
Wait a week or so before adding plants
or fish.
Pond
Plants
In
Summary
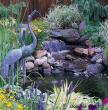
What
should a well-designed water feature
include?
*To
operate any electrical equipment near
a water garden, use an outdoor outlet.
If your pump cord will not reach to
an existing outlet have an outlet installed
set at least 6 feet from the water and
use only an outlet that is equipped
with a ground fault interrupter (GFIC)
for safety. These devices will cut off
the power the moment water is detected
in contact with the wiring. Your cable
should be protected in a conduit, a
plastic tube for electrical wires, so
you won't dig into it accidentally.
Extension cords with an integrated GFIC
can be used for shorter distances. You
can hide them under stones or mulch.
Pond
Maintenance
If
all of this seems to much for your budget
of time, and you don't want to undertake
the project yourself, many landscaping
contractors also offer water garden
construction services.