| Home
gardening is an enjoyable hobby for many
people. If you are among them, you might
benefit from a small backyard greenhouse.
A greenhouse can be built easily and inexpensively
in several hours using simple hand tools
and materials available at most building
and plumbing supply stores.
This
publication presents plans and instructions
for an easily constructed greenhouse that
only costs about $100 and may be used
for many purposes. Measuring 12 feet by
14 feet (168 square feet), it is small
enough to be unobtrusive but large enough
to meets the needs of the serious grower.
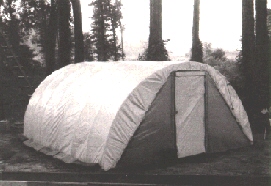
The completed structure is shown in Figure
1.
| Figure
1 - A backyard greehouse
constructed from inexpensive materials.
(Easy to put together kits are also
available) |
 |
Selecting
a Site
Choose
a level, well-drained plot for the greenhouse.
If it will be used primarily for plant
propagation in the summer, place it in
partial shade to minimize heat buildup.
A good location is the north side of a
large deciduous tree. If a partially shaded
site is not available, you can use a shade
cloth as we do at the nursery or white
plastic to control the amount of sunlight
reaching the interior.
NOTE:
If the greenhouse will be used for starting
transplants or growing plants to maturity,
it will need maximum exposure to the sun.
It should also be located where air drainage
is good; avoid low areas surrounded by
woods or buildings. Easy access to running
water and electricity is also important.
.
Constructing
the Greenhouse
The
greenhouse consists of a wooden frame
to which are attached bows of polyvinyl
chloride (PVC) pipe. The bows hold up
the clear plastic film covering, as shown
in Figures 1 through 3.
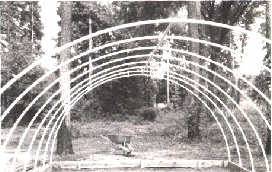
| Figure
2. Bows of PVC pipe are used
to hold up the plastic film covering.
|
 |
Use
treated lumber. Avoid wood preserved with
chemicals such as pentachlorophenol or
creosote. Lumber treated for ground contact
has a higher concentration of preservative
and therefore will last much longer than
untreated or lightly treated wood.
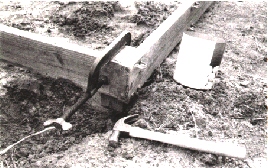
Unless
the site is very flat, you will need to
level the foundation boards. We did this
on our greenhouses by digging a trench
on the high side instead of raising the
low side, as the foundation boards should
contact the ground at all points to ensure
a good seal. To keep rainwater out, however,
the top of the foundation board should
not be below ground level, particularly
around the door. the purpose of the 4-inch-by-4-inch
post at each corner (Figure 4) is to anchor
the greenhouse and prevent it from moving
in high winds.
The
PVC pipe bows are attached to the side
boards of the foundation with electric
metallic tubing (EMT) clamps (Figure 4).
It is best to attach the clamps loosely
to the side boards with wood screws before
you secure the side boards to the end
boards and corner blocks. They may be
tightened after the PVC pipe has been
slipped into place.
PVC
pipe may be purchased in 12- or 20-foot
lengths in either schedule 40 or schedule
80 weights. Schedule 80 PVC pipe has a
thicker wall and is stronger than schedule
40 pipe. It is therefore recommended for
greenhouse construction. The 12-foot width
of the greenhouse was chosen so that each
half of the rib section of pipe is 10
feet long. PVC pipe may be easily cut
with a hand say, although a neater cut
can be made with a pipe-cutting tool specially
designed for that purpose. Care must be
taken during assembly because the cement
used to fasten PVC is fast-acting and
permanent. It should not be used when
the temperature is below 50 degrees Farenheight.
Check the directions on the can.
It
is best to lay all parts out on a flat
surface for assembly. For the ribs to
be 2 feet apart, the mid-rib pipe must
be cut into pieces about 22 1/2 inches
long (Figures 3 and 5). After all joints
have been cemented and allowed to harden
for a few minutes, position the entire
assembly over the foundation boards, bend
the ribs, and secure them in place with
the EMT clamps. Assembly is best done
by two or more people to prevent over
stressing the cemented joints. Ten feet
of galvanized EMT positioned inside the
mid-rib will give added strength to the
structure.
After
all the PVC ribs have been secured, the
end frames and door may be constructed.
Although there is a door on only one end,
both frames are essentially the same.
The two diagonals on each end give strength
to the structure and make it easy to secure
the cover. The top of the end frame may
be fastened to the end ribs with either
a wood screw of a small metal strip bent
into a U shape. If wood screw are used,
the PVC pipe must be predrilled to prevent
splitting.
Select
the type of cover material according the
intended use of the greenhouse. Clear
4- or 6-mil plastic greenhouse film is
generally best if the house will be used
for growing plants. If it will be used
exclusively for propagating or overwintering
plants, consider using 4- or 6-mil milky
or white copolymer film. White copolymer
film reduces the amount of heat and light
within the house and therefore limits
the fluctuations in these factors, keeping
conditions more nearly constant during
propagation or over the winter. However,
shading clear plastic with a 30 to 50
percent polypropylene shade cloth or greenhouse
whitewash available from horticultural
supply companies will produce nearly the
same effect.
NOTE:
Wilson Bros can order the film or shadecloth
you may need.
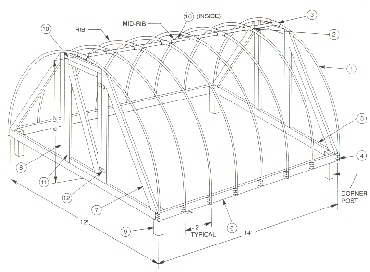
Figure
4 - Foundation side and end boards
are attached to 4-by-4 posts to anchor
the structure. Note the EMT clamps on
the side boards hold the PVC pipe ribs.
The cover may be attached
with small tacks, but staples are much
faster and are more secure. Allow the
cover to extend several inches past the
bottom of the foundation boards and cover
the extra material with packed soil to
prevent the entrance of moles and rainwater.
An inch of coarse sand or fine gravel
on the floor will reduce problems with
mud and weeds.
Figure 5 - The mid-rib
pipe is cut into sections about 22 1/2
inches long and rejoined with PVC crosses
to which the ribs are attached. Ten feet
of EMT is placed inside the mid-rib for
strength.
Operating
the Green House
It
is essential that the house be as tight
as possible so that it retain both heat
and humidity. Problems with overheating
can usually be solved by simply opening
the door. Supplemental heat can be provided
if needed during very cold weather or
at night by one or more heat lamps or
a small electric heater. Any electrical
devices used in the damp environment of
a greenhouse should be connected only
to a circuit equipped with an approved
ground fault current interrupter (GFCI)
outlet or circuit breaker. Other source
of heat can be used, but even very small
gas or oil heaters will usually overheat
a greenhouse this small and may not burn
well if not properly ventilated.
NOTE:
The greenhouse will satisfactorily support
up to 4 inches of dry snow. If the snow
is deeper or unusually wet, one or more
temporary supports should be provided
along the mid-rib to prevent collapse.
If a larger greenhouse is required, the
length may be increased. Do not increase
the width of the house without increasing
the size of the ribs. Doing so will seriously
reduce the ability of the house to withstand
snow and wind loads.
Uses
A
small greenhouse can be quite useful throughout
the year for many different purposes.
In the late winter or early spring, it
can be used to germinate and grow bedding
and vegetable plants that would otherwise
be impossible. In the summer it can be
used either with or with out a mist system
of humidifier as a propagation house to
root cuttings. It can be used in the fall
to start winter vegetable plants. During
the winter, it can protect patio plants
and other hardy but containerized woody
plants.
1.
16 3/4" PVC pipe, schedule 80, 10
feet long
2. 6 3/4" PVC crosses, schedule 80
3. 2 3/4" PVC tees, schedule 80
4. 32 3/4" galvanized electrical
metallic tubing (EMT) straps
5. 2 2"x6"x14' treated No. 2
pine boards
6. 2 2"x6"x12' treated No. 2
pine boards
7. 4 2"x4"x7' treated No. 2
pine boards
8. 4 2"x6"x6' treated No. 2
pine boards
9. 4 4"x4"x2' treated No. 2
pine boards
10. 2 2"x4"x3' treated No. 2
pine boards
11. 2 1"x4"x12' treated No.
2 pine boards (to be cut up for door parts)
12. 1 Set of door hinges
13. 1 Sheet of plastic, 24'x20', 4 mil
14. 1 Can of PVC cleaner
15. 1 Can of PVC cement
16. 1 1/2"x10' galvanized electrical
metallic tubing (EMT)
17. * Miscellaneous nails, screws, and
staples
|