|
Preparing
The Sod Bed
Planting
a new lawn from scratch can be a
big job - especially if it's a big
lawn. if your lawn is to be over
5,000 square feet you may want to
tackle planting it in sections,
which is easier on the back and
the budget. Start with the the most
visible lawn areas; then make plans
to tackle other areas the following
year. This keeps the job manageable
and makes the critical step of watering
more feasible for homeowners who
do not have in-ground sprinkler
systems. You will need to take the
following steps no matter which
grass-planting method you choose.
Remove
Old Turf and Weeds if Necessary
Many choose to use an herbicide
to kill unwanted grass and weeds
to the roots. Select an herbicide
that degrades quickly (that does
not last long in the environment),
such as glysophate (Roundup). Mix
according to the manufacturer's
directions, and completely cover
all grass plants and weeds with
the solution. Work on a windless
day when the temperature is above
60 degrees F, and take care not
to overspray on garden plants. Glysophate
is a potent, nonselective herbicide
that will kill or severely injure
all foliage it touches. Wear clothing
that covers your skin completely,
as well as eye protection, when
applying this or any other herbicide.
Afterwards, take a shower and wash
clothing separately.
You
may find that it takes several applications
of glyphosate to get the job done
- particularly if you are trying
to eleminate common bermuda. If
the turf has not completely died
after 3 weeks, reapply the herbicide
and wait 7 days after the last application
before tilling the dead turf into
your soil. Take care to follow the
manufacturer's safety precautions.
Mechanical
(manual or power) removal of undesirable
turf is the fastest way to get the
job done without needing to worry
about kids or pets contacting herbicides
or tracking them into your house.
For small lawns, a grape (grubbing)
hoe is a terrific tool for removing
turf. Anyone with a strong back
and a helper to cart away the old
turf pieces can remove up to 300
square feet in an hour. For large
lawns, consider renting a sod cutter.
It slices under the grass, enabling
you to pull up strips of old turf.
Make the job easier by cutting sod
while the lawn is moist. Follow
up with tilling to alleviate compaction
and to prepare the soil for the
amendments you'll mix in later.
Another method of turf removal,
turning existing turf into the soil
with a tiller or cultivator, is
not recommended. Only the most heavy-duty
tillers are suited for "busting
sod." And raking out the pieces
of turf after they've been turned
under is frustratingly difficult.
Fix
Grade Problems
Before adding amendments to the
soil, fix any existing grade problems.
Although grading often requires
help from a landscaping contractor
with heavy equipment, minor problems
can be fixed by the ambitious do-it-yourselfer.
Small versions of earth-moving equipment
are often available for rent.
The
first rule of grading is that the
ground should slope away from your
house in all directions so that
it drops at least 2 or 3 inches
for every ten feet. Sometimes this
is not possible to achieve, so just
make sure that the grade slopes
away from your house. The finished
grade should also end up matching
the level of existing fixtures,
such as permanent walks and patios,
as well as areas of lawn that are
not being replanted. This takes
some figuring. If you will be replanting
with seed and adding one inch of
amendments, grade so that the level
is one inch lower than fixtures.
If you will be replanting with sod
and adding an inch of amendments,
the grade should be about two inches
lower than your fixtures. Your goal
is to have the finished grade -
after the sod has been planted and
amendments added - even with the
level of your fixtures.
When
grading first focus on any problem
aeas; low and high spots. Make adjustments
by scraping away high areas and
filling in low areas. Keep a pile
of good topsoil around to spread
over any areas where sub-soil has
been exposed. Spread two inches
of the reserved topsoil over the
subsoil, and till it into the first
two inches of subsoil. This will
help prevent drainage problems between
the two layers of soil. Lastly,
spread the rest of your topsoil,
which should make up at least another
4 inches. If you need to add topsoil,
buy a screened topsoil that's free
of debris, such as roots or stones.
A landscaping rake is the best tool
for working topsoil to the proper
grade if you're doing it yourself.
The
maximum slope in a lawn should be
12 inches for every 4 feet. If the
drop is greater than 12 inches,
you should plan to build a low retaining
wall or cover the slope with a hardy
ground
cover or ornamental
grass.
Amend
the Soil
Don't put away or return the tiller
yet. Now is your chance to add amendments
such as fertilizer, organic matter,
and lime or sulfur. The opportunity
probably won't come again, so don't
skimp. The right way to proceed
is to add recommended amendments
according to the results of your
soil test. To have your soil tested,
send your samples to the local Cooperative
Extension Service. The typical recommendations
for every 1,000 square feet of new
lawn include about two pounds of
actual (elemental) phosphorus and
potassium; 50 to 100 pounds of lime
(in areas with acidic soil - excluding
Centipede and St, Augustine), and
3 - 6 cubic yards of organic matter
(such as Claycutter or Mushroom
Compost) per 1,000 square feet.
Recommendations will vary depending
on your soil's nutrient, organic
matter, and pH levels and on your
soil type. We usually use a good
starter fertilizer for bermuda,
zoysiagrass, and fescue, and 5-10-15
for Centipede or St. Augustine.
Milorganite
fertilizer is an excellent natural
alternative. To be sure, consult
with your Cooperative Extension
Service.
Ensure
even application of amendments by
dividing the recommended amounts
in half and applying half while
walking in one direction and the
other half while walking in a perpendicular
(opposite) direction. Once you have
applied the amendments, till them
into the top 6 inches of soil.
If
an overabundance of weeds was one
of your reasons for redoing this
section of lawn, allow the many
weed seeds in the turned soil to
sprout. If you rake through or till
under the weed seedlings, you can
eliminate most annual weeds.
Rake
Smooth and Firm
Rake the area to be replanted until
it's smooth. Remove any stones larger
than a 1/2 inch in size and vegetative
matter brought to the surface during
tilling.
Whether
you're planting seed or sod, it's
helpful to roll the prepared soil
to provide a firmer base on which
to work and to foster adequate soil
structure. For example, seed planted
in soil that is too loose generally
ends up being planted too deeply.
The tiny plants may die before they
reach the surface. Fill a lawn roller
about 1/3 full of water for this
job, and roll the soil until your
footprints are no deeper than 1/2
inch.
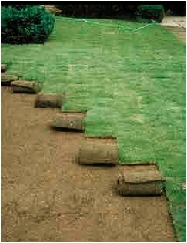
Laying The
Sod
Before
you begin, apply a starter fertilizer
that's high in phosphorus. Then
lightly water the area where you
will be installing the sod. Be prepared
to begin work when your order is
delivered. Sod can go bad quickly,
especially if it begins to heat
up or dry out.
TIP:
Sod usually comes with 500 square
feet to the pallet. Measure and
mark out 500 square feet areas (20'
x 25') of the sod bed with latex
spray paint and have the delivery
person place the pallets just outside
these areas. Placing in such a way
will tremendously reduce the amount
of walking back and forth or wheelbarrowing
sod to the sod bed.
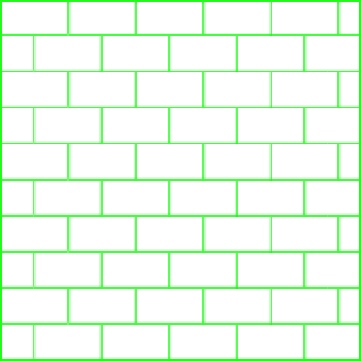
Lay
sod over one section of lawn at
a time. Begin by laying full strips
along the outside edge (such as
the sidewalk) of the area you plan
to sod, then laying a row around
the perimeter of the sod bed. Next,
begin to lay new rows along the
first, straight row that you layed,
and so on in a brick pattern as
shown in the diagram below.
Lay
the strips so that they overlap
the perimeter border; trim away
the excess later with a sharp knife,
hatchet, or weed eater with a sod
cuting attachmentl. Again, try to
install all of the sod the day it
is delivered. If you have sod left
over, unroll it in a shady spot
if possible, water it lightly, and
use it the next day.
If
you're installing sod on a slope,
start laying the sod at the lowest
point. Stake each piece, with sod
staples (available at Wilson bros.
Nursery and most garden centers),
in three places to prevent slippage.
Staples should be equally spaced
and set in from the sod strip's
edges by at least 6 to 8 inches.
After
installing the sod and before watering,
firm it by rolling with a one-third
full roller. If the roller is too
heavy, it could cause the sod to
slip. In hot weather, lightly watering
the sod prior to rolling will also
help prevent slippage. Follow rolling
immediately with a thorough soaking
-- to a depth of 6 - 8 inches. During
warm weather it should take about
4-5 days for the sod to root in.
In the meantime make sure to keep
sod bed damp. Check for soil moisture
by ligfting the corner of a strip
of sod.
SEE ALSO:
|