|
STEP
1 - Measuring & Ordering
Measure
the area of your planned lawn. Grab a
pencil and a sheet of paper. Start by
measuring the length of the lawn area
and write this figure down. Then measure
the width of the lawn area and write this
figure down. Multiply these two figures
and you will have the total square footage
of the lawn area. If you have multiple
areas repeat the instructions above for
each area and then add the square footage
of each area together to determine total
square feet.
If
your lawn area is 100' long by 50' wide
your equation would look like this: 100'
x 50' = 5,000 square feet.
| |
|
|
 |
|
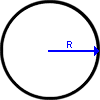
Measuring
a Circular Lawn Area:
Multiply
the length of the radius by itself.
(The radius of a circle is the point
from the center of the circle to
the outside edge of the circle.)
After multiplying the radius of
a circle by itself then multiply
this figure by 3.14. If the length
of the radius of a circular area
is 10 feet the equation to determine
total square footage of the circle
would look like this: |
| |
|
10'
x 10' = 100', then 100' x 3.14 =
314 total sq ft |
Make
sure and schedule your order for delivery
of the turf after preparatory work is
completed and you are ready to install.
Prompt installation on the day of delivery
is crucial to a strong beginning for your
lawn.
STEP
2 - Remove Old Turf And Weeds If Necessary
Begin
by spraying any and all existing weeds
and grasses in the area to be sodded with
a systemic weed killer such as Round-up
or Hi Yield Killzall. Allow minimum of
10-14 days for good kill. If there are
desirable plants nearby the lawn area
be careful not let the spray hit them.
STEP
3 - Adding Ammendments And Grading
Before
adding amendments to the soil, fix any
existing grade problems. Although grading
often requires help from a landscaping
contractor with heavy equipment, minor
problems can be fixed by the ambitious
do-it-yourselfer. Small versions of earth-moving
equipment are often available for rent.
If
you have an underground sprinkler system,
be sure to flag the sprinkler heads so
you won't damage them during preparation
and installation.
The
first rule of grading is that the ground
should slope away from your house in all
directions so that it drops at least 2
or 3 inches for every ten feet. Sometimes
this is not possible to achieve, so just
make sure that the grade slopes away from
your house.
The finished grade should also end up
matching the level of existing fixtures,
such as permanent walks and patios. Grade
so that the level is one inch lower than
fixtures. If you will be adding an inch
of amendments, the grade should be about
two inches lower than your fixtures such
as your driveway and walkways. Your goal
is to have the finished grade - after
the sod has been planted and amendments
added - even with the level of your fixtures.
When
grading first focus on any problem areas;
low and high spots. Make adjustments by
scraping away high areas and filling in
low areas. If you need to add topsoil,
buy a screened topsoil that's free of
debris, such as roots or stones.
After
grading problems have been fixed, soil
ammendments can be applied. If your soil
is heavy clay, or poor quality, ammend
with an inch layer of screened topsoil,
sand and/or organic mixture/compost. For
best results, rototill the ammendments
in to a depth of 3 to 6 inches and then
rake to smooth. When raking to smooth,
rocks smaller than a quarter can be left
but be sure to remove any large rocks,
roots or other debris. Make sure that
your finish grade is about an inch below
the level of existing surfaces such as
drives and walkways.
Before
installing your sod, It's helpful to roll
the prepared soil to provide a firmer
base on which to work and to foster adequate
soil structure. Rollers are available
at your local tool and equipment rental
store. Fill a lawn roller about 1/3 full
of water for this job, and roll the soil
until your footprints are no deeper than
1/2 inch.
Before
installing sod you will want to broadcast
fertilizer and pelletized lime (Centipede
and St. Augustine do not require lime).
The right way to proceed is to add recommended
fertilizer according to the results of
a soil test. To have your soil tested,
send your samples to the local Cooperative
Extension Service. If you choose not to
do a soil test, our recommendations would
be to apply a good lawn starter fertilizer
at the rate recommended on the bag, and
50-100 pounds of pelletized lime per 1,000
square feet of lawn area.
STEP
3 - Order Your Sod
Now
that you have finished grading the lawn
area it's time to order the sod. Sod can
be ordered in squares and sometimes rolls
and typically comes 500 square feet to
the pallet. When ordering, make sure to
ask how many square feet will come to
the pallet. Knowing this may help to determine
where pallets will be placed for ease
of installation.
If
you have yet to choose a type of grass
for your new lawn go to:
Choosing
The Right Grass
If
you live in the state of Georgia, or surrounding
areas in bordering states, give us a call
and we'll be happy to give you a quote:
770-573-4420
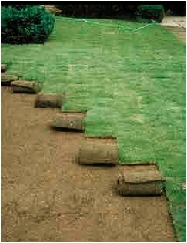
STEP
3 - Turf Installation
Install
your lawn immediately upon delivery. Begin
watering lawn within 30 minutes of installation.
Turf is a living plant that requires ground
contact and moisture to survive!
Begin
by installing turf along the longest straight
line, such as a driveway or sidewalk.
This first line is important, as it will
help you establish the entire lawn correctly.
Butt and push edges and ends against each
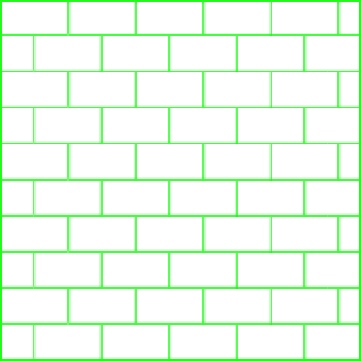
other tightly, without stretching. Avoid
gaps or overlaps. Stagger the joints in
each row in
a brick-like fashion as shown in the diagram
below.
Use
a sharp knife, machete or hatchet to trim
around sprinkler heads, sidewalks, etc.
Avoid leaving small strips at outer edges
as they will not retain moisture. On slopes,
place the turf pieces across the slope,
instead of up or down the slope.
If
installing on an especially rainy or wet
day, sometimes it helps to use some strips
of plywood to help you from sinking into
the new soil area. As you lay an area,
place some runner strips of plywood down
to get to the next area.
After
installing the turf, roll the entire area
to reduce air pockets.
Try
to install all of the sod the day it is
delivered. If you have sod left over,
remove it from the pallet and place in
a shady spot if possible, water it lightly,
and use it the next day.
STEP
4 - Watering
Give
your new lawn 1 inch of water within 1/2
hour of installation. Water once daily,
or more often (especially on hot and windy
days), keeping turf moist until it is
firmly rooted and knitted together(about
7 to 14 weeks). Once the sod has knit,
it should be watered enough over the first
few months to maintain a healthy growing
condition. After established, weather
conditions will dictate the amount and
frequency of watering. Be certain that
your new lawn has enough moisture to survive
hot, dry, or windy periods.
Water
areas near buildings more often where
reflected heat dries the turf.
Caution:
During the first three weeks, avoid heavy
or concentrated use of your new lawn.
This includes keeping your larger dogs
off of the area. This gives the roots
an opportunity to firmly knit with soil
and insures that the turf will remain
smooth.
Maintenance
With
proper care, your new lawn will remain
a great asset, providing beauty, a clean
playing surface, and an improved environment.
Approximately
7 to 10 days from time of installation
mow with a sharp mower. The first mow
should not be attempted until sod is firmly
rooted and secure in place. Generally,
remove no more than 1/3 of the grass height
at a mowing. Keep your mower blade sharp.
For
more lawn maintenance guidelines go to:
Lawn
Maintenance
|