Wilson
Bros Nursery is OPEN TO THE PUBLIC 7 DAYS A WEEK!
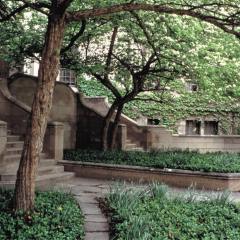
Planting
Groundcovers
Instructions
For Planting Groundcovers
Groundcovers
in the landscape are hugely
important - they tie all other
plantings together improving
the overall look of the landscape
or garden, serve as erosion
controllers on slopes or embankments,
and are a replacement for costly
mulches in foundation plantings
or other beds. Groundcovers
are often the only alternative
to cover bare areas under the
canopies of large trees or on
slopes or embankments where
grass or other plants cannot
be grown. We use groundcovers
throughout every landscape design
we draw. Below are general instructions
for planting groundcovers.
Step
1 - Site
Preparation: In
areas where you will plant groundcovers
make sure to eliminate any existing weeds
or grasses first. Spray existing weeds with
a solution of a weed killer such as Killzall
Super Concentrate. (Follow instructions
on the product label for mixing and application.)
Allow two hours after spraying before you
begin planting. You may till area to be
planted however it is not necessary.Be careful tilling around the root
systems of large trees as you will not want
to damage them. Note: After
planting, we highly recommend broadcasting
Treflan Granules over the
planted area to provide up to 1 year of
weed control. Treflan Granules kill weed
seeds before they germinate.
Step
2 - Groundcover
Selection: Determine
what type of groundcover you would like
to plant. There are groundcovers suitable
for sun or shade and some, such as Purple
Winter Creeper, which tolerate full sun
or full shade! Certain groundcovers, such
as Blue Pacific Juniper or Cotoneaster,
are perfect for use on steep slopes or embankments.
Others are more suited for use under large
trees, in foundation plantings to grow in
and around shrubs, or between stepping stones
or pavers. SEE: Groundcover
Plants. After selecting the type of
groundcover you want to plant make note
of suggested spacing distance. You will
need this to determine the number of groundcover
plants that will be required to cover the
area.
Step
3 - Measure
the area to be planted to determine how
many plants will be needed to cover the
area. For large open areas such as embankments
you can use the chart below to determine
how many plants are needed. Start by taking
measurements of the leght and width of the
area to be planted. Then multiply the length
by the width of the area to be planted to
determine total square footage. If the length
is 50', and the width is 10', your area
will have 500 total square feet. For circular
areas measure the length of the radius of
the circle (measure from center of the circle
to the outside edge/ half the diamter).
Then multiply the radius by itself (If the
radius is 10', multiply 10 x 10 to get 100).
Then multiply this number by 3.14 and you
will have the total square footage of the
circular area. For right (90 degree) triangles
multiply length by width and divide by 2
to determine total square footage. For other
odd shaped beds, or areas where you will
be planting groundcovers amongst other shrubs,
use the suggested spacing to determine the
number of groundcovers needed.
Plants
Needed Calculator
Spacing
Plants
Needed Per Sq Ft
6"
4.0
8"
2.25
10"
1.50
12"
1.0
15"
.64
18"
.44
24"
.25
36"
.11
Step
4 - Space
plants out in the area to be planted at
the predetermined distance apart. Begin
by setting out a row of plants along one
of the edges of the perimeter making sure
to space them at a distance far enough from
the edge to allow for future spreading.
For example, plants that should be spaced
24" apart should be spaced at a distance
of 12" from the edge of the bed or
surfaced area. After setting out the first
row, stagger the plants on the second row
as shown in the diagram above. For steep
slopes, where plants will not stay put,
it may be necessary to use spray paint to
mark dots or x's where plants will be planted.
Step
5
- Planting:
After all of the plants have been set
in place, or marked, you may begin planting.
To plant, dig a hole 2 times as wide or
more than the container the plant came
in. Mix in Claycutter Organic
Soil Ammendment at a 50/50 ratio
with the soil dug from the hole. Remove
the plant from the container and scratch
root ball to loosen feeder roots. Place
plant in hole making sure that the top
edge of the root ball is level or slightly
above the level of the ground. Backfill
around the rootball with soil mixture
tamping lightly as you go to remove air
pockets. When all plants have been installed
apply a 2-3" layer of pinestraw or
wood mulch throughout the planted area.
When planting groundcovers such as Ivy,
that may have long runners, we spread
mulch before planting and rake back a
small area in order to plant.
Watering
Groundcovers - Newly
planted groundcovers, from sprigs or 4"
pots, should recieve at least 1"
of water per week from rain or hand watering
until plants have become established.
Groundcovers planted from 1 gallon or
larger size containers should also recieve
1" of water per week until rooted
in. Once established, most of the groundcovers
we list are drought tolerant and will
require very little attention.
Fertilizing
Groundcovers - Most
groundcovers should be fertilized twice
a year; once in the early spring, and
again in early fall. We use 14-7-7
Nursery and Landscape Fertilizer
or Milorganite.
This fertilizer is slow release and includes
an elements package with iron and other
minerals to keep plants healthy, vigorous,
and strong in color. Follow directions
on product label for application amounts..
Pruning
Groundcovers-
Typically, groundcovers
are low maintenance and therefore require
little if any pruning. If the foliage
reaches beyond the bed, or over lawn areas
or other surfaces, you may clip back at
any time of year.