| |
 |
ALL
ABOUT SUMMER
BULBS |
|
| |
|
|
Summer Bulbs
We often think of planting spring bulbs
such as tulips and daffodils for spring
color, but there are many summer flowering
bulbs, corms, rhizomes and tubers that
add color and a touch of the tropics
to the warm season garden.
In warmer climates such as ours, many
of these flowering bulbs can be left
in the ground all year and some will
even naturalize. Plant them in islands,
beds, around the pool, or in containers.
Now, lets skip all the flowery talk
and get straight to the information
and instructions you need for properly
planting and successfully growing bulbs.
|
|
Planting
Summer Bulbs
Which end is up?
That’s a good question!
Most bulbs have a clearly defined,
tapered tip that should point up when
planted. Some bulbs are more rounded
and have a slightly tapered, “up”
end and a flatter “down”
end that usually shows evidence of
roots. If your bulb does not have
a clear “up” end, follow
the planting instructions printed
on the package label. If in doubt,
we suggest planting irregular-looking
bulbs sideways. |
 |
Their shoots will
naturally grow toward the sun. For
bareroot plants, it’s not
always easy to tell which end is
up, but most will have a “crown”
- the point at which all the roots
come together. You may even see
new growth emerging from the crown.
Typically the crown of the plant
is planted one inch or so below
the soil surface with the roots
draped over a mound of soil and
spread downward into the planting
hole. Each type of bulb and bareroot
plant has its own recommended planting
depth and spacing guidelines. Please
refer to the plant-specific instructions
further below or on each package
label.
Tips
for Success
Watering
After planting, give your plants
a thorough watering. As your plants
are establishing themselves in your
garden, it’s important to
water them
regularly if there is no rainfall.
Watering twice weekly, for the first
few weeks, is a good idea. After
that, check the soil moisture weekly
and water as needed. If you experience
particularly hot or dry weather
during the summer, it may be necessary
to water more than once a week,
especially plants growing in containers
or in full sun. Maintaining adequate
moisture in the soil reduces stress
and promotes long-lasting blooms.
Some plants have more specific watering
requirements; please refer to the
individual plant care instructions
further below.
Fertilizing
A bulb is a plant’s food storage
system. During the first year of
bloom, the bulb provides the plant
with most of the nutrients it requires.
But, for best results, and to ensure
good blooms the following season,
we recommend supplementing your
soil with a balanced, slow-release
bulb or flower fertilizer such as
Bloom Start. Typically, one application
of fertilizer in the spring is enough
to provide your plants with the
extra nutrients they need to produce
healthy foliage and long-lasting
flowers.
Some perennial plants can be encouraged
to produce more flowers for a longer
period of time when watered with
a balanced liquid fertilizer during
the growing season. For more specific
fertilizing recommendations, please
refer to the individual plant care
instructions further below.
Mulching
Applying a 2-inch-thick layer of
mulch over your garden beds helps
retain moisture and maintain even
soil temperatures. It also helps
to
suppress weeds.
Dividing
Perennials generally require division
every three to five years. You can
tell it’s time to divide if
your plants appear too crowded or
if you notice
decreased flower production. Late
fall or early spring are the best
times to divide perennials. Dig
the entire clump from the garden,
retaining as many roots as possible.
Divide the plant into portions,
gently pulling clumps away from
the main plant. Some plants will
be bound tightly together. You may
need to cut them apart with a sharp
spade or gardening knife. Each division
should contain a number of healthy
shoots and roots. Plant the division
just as you’d plant a new
plant. Be sure to water thoroughly.
Planting
In Containers
Many summer-blooming bulbs and perennials
can be grown in containers as easily
as they can be grown in your garden.
Some plants may even do better when
planted in containers - refer to
our plant-specific instructions
below for recommendations.
Keep these things in mind when planting
in containers:
• Choose a pot with a drainage
hole or add several inches of drainage
material, such as broken crockery
or gravel, to the bottom of the
pot before adding potting mix. If
your container does not have adequate
drainage, excess moisture can cause
plant roots to rot.
• Use a light potting mix
that contains some peat, perlite
and/or vermiculite. Don’t
use garden soil—it packs too
tightly and may contain diseases.
• Leave at least a few inches
of space between plants, although
they can be planted closer together
than you would plant them in your
garden.
• Containers dry out faster
than garden soil and may require
daily watering during the summer.
Check the moisture level every day
or two.
• Potting mix contains fewer
nutrients than garden soil. We
recommend giving your container-grown
plants a weekly application
of balanced, liquid fertilizer during
the growing season.
|
Container
Gardening with Summer Bulbs
| Summer bulbs such as
Begonias, Canna Lilies, and Calla
Lilies are well-suited to containers.
Growing in containers saves space,
but it's also a smart alternative
if you are restricted by too much
shade, poor soil, too little time,
limited mobility or a difficult climate.
Container gardens can be much more
productive than a regular garden while
allowing you to avoid most pest and
disease problems. Best of all, it
brings your garden right up close,
creating a sense of intimacy that
you don't get in an ordinary backyard
garden. |
 |
Almost
anything can serve as a container
for growing plants. In addition
to terra cotta, plastic or pressed
fiber pots, you can use recycled
whiskey barrels, 5-gallon food buckets,
bushel baskets, plastic tubs, wooden
planter boxes, even old tires! Self-watering
planters, which have built-in water
reservoirs, are great innovations.
The size of container that you
use should be determined by the
plants you plan to grow. Begonias
may get by in a 6-inch deep container,
but don't try to grow a canna in
a container that holds less than
3 gallons of soil. The general rule
is to use the largest container
possible, because the more soil
there is, the more root space there
will be -- and the longer your plants
can go between waterings.
Make sure the containers have drainage
holes -- on the sides rather than
the bottom if possible -- so excess
water can drain and roots won't
get waterlogged. For large pots
with drainage holes on the bottom,
elevate the pots on bricks or scraps
of wood so that the water can escape.
In general, a 20-gallon pot should
have four to six 3/4-inch holes;
a 30-gallon pot should have at least
eight 1-inch holes. You can put
stones or bits of crockery in the
bottom of the pot, but with a well-aerated
soil mix, this is unnecessary and
will only steal valuable root space.
Once you have chosen the right
container, you are ready to pick
a soil mix. Soil for container-grown
plants should be light and friable,
well drained and moisture-retentive.
Garden soil is much too dense and
can introduce disease and insect
problems. Most container-grown plants
are happiest in a soilless blend
such as is found in most professional
potting mixes. At the nursery we
offer Pennington Pro Potting Soil.
Any soil mix will become compacted
over time. If your containers seem
water-logged and heavy, you may
need to replace your soil mix at
the start of a new growing season
with a fresh mix.
Watering
If you go off to work in the morning
without watering your windowboxes
or patio containers, you are likely
to come home to droopy, if not dead
plants. When plants get too dry,
their delicate feeder roots die
and the plant must concentrate its
energy on re-growing damaged roots
rather than producing fruit or flowers.
That means unless you use self-watering
planters or have a drip-irrigation
system, you'll probably need to
check on your plants daily, and
maybe even twice a day if the weather
is really hot. If you have more
than a few planters, and especially
if you travel, a drip-irrigation
system is ideal.
Three Watering Innovations
for Containers
1. Water-holding crystals absorb
and retain up to 200 times their
weight in water. When blended into
the soil, polymers can reduce your
watering chores by 50 to 70 percent.
2. Self-watering containers have
an inner pot that holds the plant
and soil, and an outer pot or bottom
reservoir that holds extra water.
A wick joins the two and pulls water
up into the root ball as it's needed.
Most reservoirs are large enough
to supply water for several days
or more depending on the weather.
Liquid fertilizer can be added to
the reservoir to ensure an adequate
supply of nutrients. These containers
can generally be used both indoors
and out.
3. Drip-irrigation systems are
simple, easy to install and take
the work and worry out of watering.
Add a timer and your plants will
be content even if you can't be
there to give them daily attention.
Watering Tips
Start with a moisture-retentive
soil mix.
Water until all the soil in the
container is moist and water runs
out the drainage holes.
For large containers, reduce evaporation
by covering the soil surface with
a thin layer of attactive mulch
such as shredded bark.
Your plants will always prefer
rainwater (collect it in a barrel
from your roof) rather than using
treated soft water. So, try collecting
water in a barrel to water your
container plants.
Fertilizing
Because most potting mixes provide
few nutrients, your plants will
be totally dependent on you for
their food. Add granular fertilizer
such as Bloom Start at planting
time, then water weekly with half-strength,
water-soluble fertilizer for an
added benefit.
Maintenance
Each week during the growing season,
remove spent flowers and pinch back
leggy stems. When necessary, replace
tired plants with some fresh annuals,
especially late-season favorites,
such as ornamental kale, and Pansies.
If you plan to overwinter some
of your potted plants, they should
be cut back and put in a cool location.
Water sparingly and do not fertilize
until spring. Once warm weather
arrives, remove plants from their
containers, tease away old soil,
and repot the plants in a fresh
soil blend. |
_______________________________________________________
Summer Bulb Listing
Wilson Bros.
Favorites! |
|
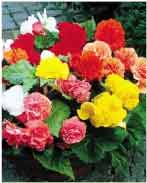
Tuberous
Begonias |
Begonia tubers are slow
to start growing (typically
taking four to six weeks to
show signs of growth), but,
once they begin blooming,
they will continue to produce
flowers all summer long, whether
you plant them in the garden
or in containers. Keep Begonia’s
cultural requirements in mind
when choosing where to plant
them:
• Provide morning sun
and afternoon shade. Avoid
hot, sunny locations.
• Keep soil evenly moist,
but well-drained. Do not allow
water to
stand in pots.
• Provide good air circulation
so that foliage dries quickly
after rain
or watering.
• Protect from strong
wind.
Plant tubers 1 to 2 inches
deep and 8 to 12 inches apart
with their rounded side down
and the hollow or dimpled
side up. You may see evidence
of pink growth tips on the
“up” side. For
earlier bloom, plant tubers
in pots 6 to 8 weeks before
your last anticipated spring
frost. Then, transplant them
carefully into the garden
without disturbing the roots
after frost danger has passed.
To encourage constant flowering,
apply a liquid fertilizer
every two to three weeks during
the growing season. Begonias
are hardy in zones 9 to 10
and can remain in the ground
over the winter. In zone 9,
apply a protective layer of
mulch for the winter.
In zones 3 to 8, (our zone)
tubers must be stored indoors
for the winter. After the
first frost, dig the tubers
and allow them to dry in a
frost-free location, out of
direct sunlight, for a day
or two. Remove the spent foliage
and excess soil. Store the
tubers in dry peat moss in
a cool, dark place - 35 to
40 degrees F is ideal. Replant
the following spring, once
the danger of frost has passed.
Height: 8 to 12 inches. Hardy:
zones 9 to 10. |
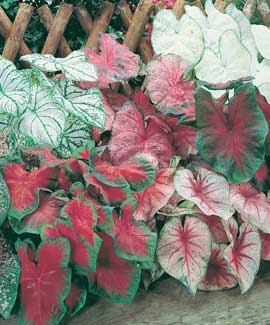 |
Caladiums |
Caladiums are ideal for shady
areas of the garden and make
excellent container plants.
They thrive in warm and humid
conditions and grow best in
morning sun or full shade. Plant
bulbs 6 to 8 inches apart and
1 inch deep with the rounded
side up. Don’t be alarmed
if they take a while to get
going; Caladium growth will
wait until soil temperatures
reach 60 degrees F before they
begin to grow. Water frequently
and apply a liquid fertilizer
once a month during the growing
season. Caladiums are winter
hardy only in zone 10. In other
areas of the county, they must
be dug up in the fall and stored
indoors for the winter. The
bulbs must be dug well before
the first frost, ideally when
soil temperatures drop to between
50 and 55 degrees F. Allow soil
to remain on the roots. Dry
the bulbs outdoors, but out
of direct sunlight, for about
one week. Once dried, remove
any remaining foliage and excess
soil. Store in dry peat at around
70 degrees F. The following
spring, plant the bulbs in pots
or outdoors after the danger
of frost has passed. Height:
18 to 20 inches. Hardy: zone
10. |
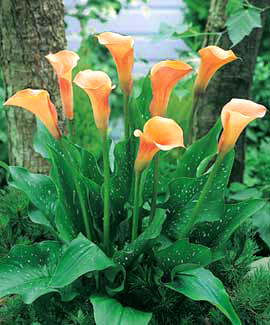 |
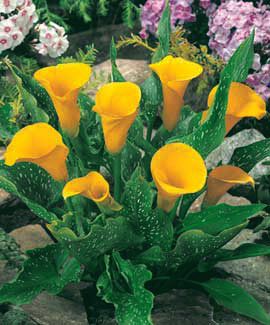
Calla
Lily |
Calla lilies perform best
when they receive full sun and
plenty of moisture in your garden
or in patio containers. Plant
the bulbs in full sun, 3 to
4 inches deep and 6 to 8 inches
apart. During active growth,
apply a balanced liquid fertilizer
every 2 to 3 weeks. In zones
8 and 9 (our zone), they can
be left in the ground all year,
but we recommend winter mulch.
In zones 3 to 7, Calla Lilies
must be dug up and brought indoors
for the winter. After the first
frost, dig the plants from the
garden and dry the bulbs in
a frost-free location out of
direct sunlight for a few days.
Once dry, remove the foliage
and any excess soil from the
roots. Store the bulbs in a
dry, frost-free place—50
to 60 degrees F is ideal. Replant
in the spring after the danger
of frost has passed.
Height: 15 to 36 inches, depending
on variety. Hardy: zones 8 to
10. |
 |
Canna
Lily |
Cannas are sun-loving, tropical
plants with large, showy foliage
that produce spikes of blooms
from mid-summer to fall. Cannas
do equally well in pots or in
garden beds, as long as they
have at least six hours of direct
sun each day and loose, well-drained
soil. Plant the rhizomes 3 to
4 inches deep and at least one
foot apart after all danger
of frost has passed. If your
frost-free date is still a few
weeks away, you can give your
Cannas a head start indoors.
Plant each rhizome in a one-gallon
container using potting mix
that drains well. Place the
container in a sunny indoor
location and keep the potting
mix barely moist. After the
danger of frost has passed,
transplant the Cannas into your
garden or into larger pots (at
least 12 inches in diameter),
taking care to avoid disturbing
the roots. In zones 7 to 10
(our zone), Cannas are hardy
and can remain in the ground
over the winter. In zones 7
and 8 (our zone), it’s
best to apply a protective layer
of mulch. In zones 2 to 6, Cannas
must be dug up and stored indoors
for the winter. In the fall,
following the first mild frost,
trim the stalks to 6 to 8 inches
from the ground and dig the
plants from the garden, removing
any adhering soil. Allow them
to dry for a few days in a frost-free
location, out of direct sunlight.
Once dried, store the rhizomes
in peat moss in a cool, dry,
frost-free place—45 to
50 degrees F is ideal. Replant
in the spring, after the danger
of frost has passed.
Height: 30 to 36 inches. Hardy:
zones 7 to 10. |
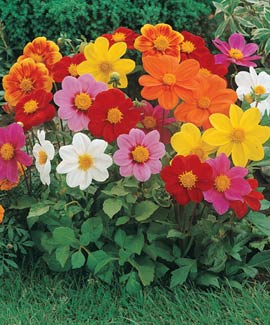 |
Dahlias |
Dahlias provide bold color
and dramatic flowers beginning
in early to mid-summer and
lasting through the first
hard frost. They perform best
when grown in full sun with
plenty of water. Plant the
tuber with the crown (place
where the tubers meet the
stem) 3 to 4 inches below
the soil surface. Please see
individual labels on packages
for specific spacing information.
In cooler areas of the country,
it’s important to delay
planting until all danger
of frost has passed. If your
frost-free date is still a
few weeks away, you can give
your Dahlias a head start
indoors. Plant each tuber
in a 1-gallon container using
a professional potting mix
that drains well. Place the
container in a sunny indoor
location and keep the potting
mix barely moist. Once the
danger of frost has passed,
transplant the Dahlias into
your garden, taking care to
disturb the roots as little
as possible. Dahlias that
will grow taller than three
feet benefit from a 2- to
3-foot-tall support stake.
It’s a good idea to
put the stake in place while
you are planting the tubers
to avoid damaging them. Low-growing
Dahlias, such as Topmix, Border,
Pompom and Mignon Dahlias
are the most suitable for
growing in containers.
Plant one tuber per 12-inch
pot, using lightweight potting
mix. Choose a larger pot or
long window box if you want
to plant multiple plants per
container. Keep soil evenly
moist, watering Dahlias at
least twice a week when rainfall
is insufficient. To develop
bushy, floriferous plants,
pinch off the top of the sprout
after four leaves have developed.
Then, allow the plant to grow
without further pinching.
Dahlias are hardy and can
remain in the ground over
the winter in zones 8 to 10.
In zone 8 (our zone), it’s
best to apply a protective
layer of mulch. In colder
areas of the country, zones
2 to 7, Dahlias need to be
dug up and stored indoors
for the winter. In the fall,
following the first mild frost,
dig the plants from the garden.
Allow them to dry for a few
days in a frost-free location,
out of direct sunlight. Once
the tubers have dried, remove
any excess soil and the remaining
foliage, leaving 2 to 4 inches
of the stem. Store the tubers
in dry sand or a paper bag
in a cool, dry, frost-free
place—45 to 55 degrees
F is ideal. During the winter,
check the tubers for signs
of rot every month or so.
Discard any rotting tubers
to prevent damage to the healthy
ones. Replant in the spring,
after the danger of frost
has passed.
Height: 15 to 48 inches, depending
on variety. Hardy: zones 8
to 10. |
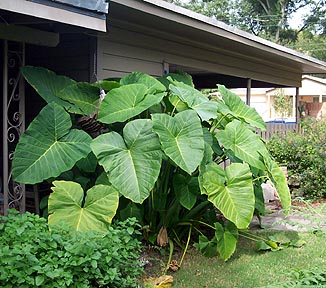 |
Elephant
Ears |
| Elephant Ear
plants are a big, leafy member
of the Caladium family. We're
talkin' big leaves, as big as
an elephant's ear. And, the
colorful leaves have a shape
resembling an elephant's ear,
too.
We continue to be fascinated
by this big-leaved plant that
grows three to five feet tall
- upright giants grow even
taller. Originating in tropical
and sub-tropical areas, they
love sunshine, heat, and high
humidity. They are easy to
grow and will grow in sun
or shade.
Elephant Ears are grown from
tuberous bulbs. We stock the
bulbs during spring at the
nursery.
In southern areas such as
ours, elephant ears can remain
in the ground over winter.
Add a heavy layer of mulch
to protect the bulbs from
freezing.
How to Grow Elephant
Ears: Find a sunny
or shady location. Elephant
ears prefer a rich, organic
soil. They are moisture lovers,
but the soil needs to drain
well. Plant bulbs in early
spring. Mix in plenty of compost
and organic matter. Apply
a nitrogen rich fertilizer
once every couple of months
or so for optimum growth.
Keep soil moist all season
long.
Mulch around plants heavily
every year to help retain
water, and to replenish organic
matter.
|
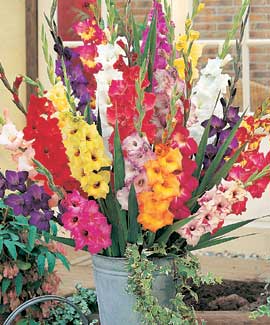 |
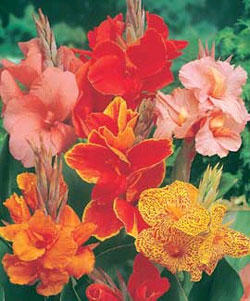
Gladiolus |
Gladiolus make wonderful cut
flowers for summer bouquets.
Choose a sunny location that’s
protected from strong winds.
Plant the bulbs 5 inches apart
and 4 to 5 inches deep. The
“up” side will have
a pointed tip in the center
of the bulb and the “down”
side will show evidence of last
year’s roots. For the
best effect, plant in groups
of 10 to 15 bulbs. To guarantee
the longest lasting show of
flowers, plant the bulbs in
succession. Begin planting in
early spring and continue planting
at intervals of 10 to 14 days
until mid-June. Apply a balanced
liquid fertilizer about every
ten days
from the time the buds appear
until flowers begin to open.
Most Gladiolus are hardy in
zones 7 to 10 (Our zone), though
it’s best to apply a protective
layer of mulch to the planting
area over the winter. In zones
3 to 6, Gladiolus need to be
dug up and stored indoors for
the winter. Before the first
fall frost, when the foliage
begins to turn yellow, dig the
plants and remove excess soil.
Detach and discard any “baby”
bulbs found on the sides or
bottom of the “mother”
bulb. Allow the bulbs to dry
in a frost-free location for
a few days. Once dry, remove
the stalks and any old roots.
Store the bulbs inside paper
bags or old nylon stockings
in a cool, dry place—40
to 55 degrees F is ideal. Replant
outdoors in the spring, once
the danger of frost has passed.
Gladiolus nanus (Hardy Glads)
are an exception and can be
left in the ground year round
in zones 4 to 10. Height: 20
to 48 inches. Hardy: zones 7
to 9. |
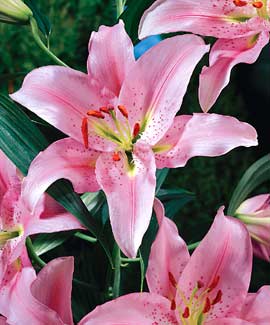 |
Hybrid
Lilies |
Lilies are among the few bulbs
that can be planted in both
spring and fall. They do not
have a protective tunic or “coat”
to prevent them from drying
out, so plant these fragile
bulbs as soon as they arrive
or as soon as you purchase them.
Plant in full sun to part shade,
6 inches deep and approximately
10 inches apart. Lilies like
their “heads” in
the sun and their “feet”
in the shade. To keep their
roots cool over the summer,
apply a 1-inch layer of mulch
to the planting area in the
spring. Over the years, they
will form nice clumps in your
garden.
Height: ranges from 24 to 40
inches. Hardy: zone 4 or 5 to
9,
depending on variety. |
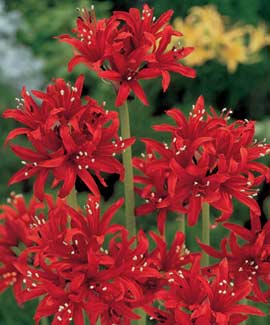 |
Nerine
(Spider Lily) |
In late summer
or early fall, graceful flowers
float above grass-like foliage
on strong, 18 to 20-inch stems.
Plant bulbs in a cutting garden
or a patio container. When planting
in the garden, plant in full
sun, 4 to 6 inches apart and
4 to 5 inches deep. In a container,
plant with the top third of
the bulb above the soil surface
and place in a sunny, outdoor
location. In zone 8 (our zone),
apply a 2-inch-thick-layer of
mulch to the planting area in
late fall. In zones 3 to 7,
the bulbs must be dug up before
the first frost and stored indoors
for the winter. After digging,
allow the bulbs to dry out of
direct 24 sunlight for a few
days. Once dry, remove any excess
soil and remaining foliage.
Store bulbs in a cool, dry place
- 40 to 55 degrees F is ideal.
Replant in the spring, after
the danger of frost has passed.
Height: 18 to 20 inches. Hardy:
zones 8 to 10. |
|
|
|
|
Other
'All About' Pages
Free
Garden Designs
|
|
|
|